
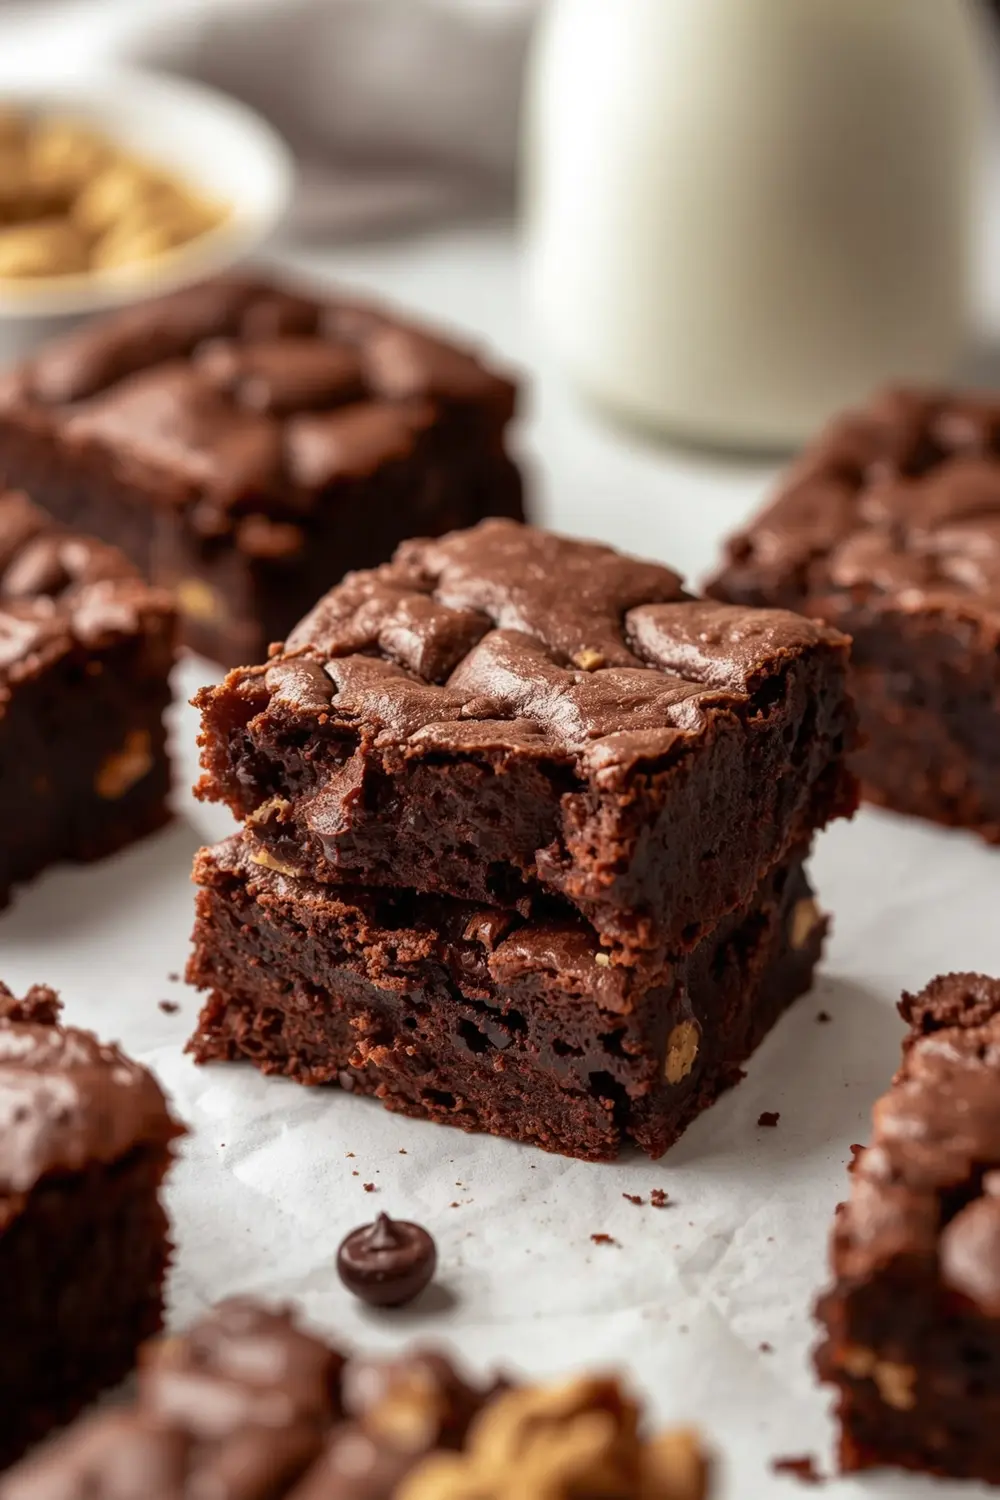
Chocolate brownies are about to become your go-to dessert. I’m talking fudgy, rich, and honestly so easy you’ll make them on a random Tuesday night just because. No fancy equipment needed, just one bowl and 30 minutes in the oven.
Ever had one of those desserts that tastes like you slaved away for hours? That’s what these brownies deliver, except you won’t. Plus, they’re the kind of treat that works for after school snacks, potlucks, or when you need to impress someone last-minute.
Want to know the real magic? It’s the combo of cocoa powder and chocolate chips that makes them taste bakery-quality. And if you’re looking for more chocolate dessert ideas that are equally simple, check out our chocolate chip cookie recipe next. Bookmark this one for meal prep day.
Why this chocolate brownies recipe works
Know what makes a brownie actually fudgy instead of cakey? The right ratio of wet to dry ingredients, plus not overbaking them. I learned that the hard way after pulling a dry batch from the oven once.
- Fudgy texture that stays moist for days without being gooey or underbaked
- One-bowl method means less cleanup and faster baking start time
- Budget-friendly ingredients you probably have in your pantry already
- Packed with chocolate flavor from both cocoa powder and chocolate chips
| Prep Time | Cook Time | Calories | Servings | Cuisine |
|---|---|---|---|---|
| 15 minutes | 30 minutes | 285 per serving | 12 servings | American |
Ingredients for chocolate brownies recipe
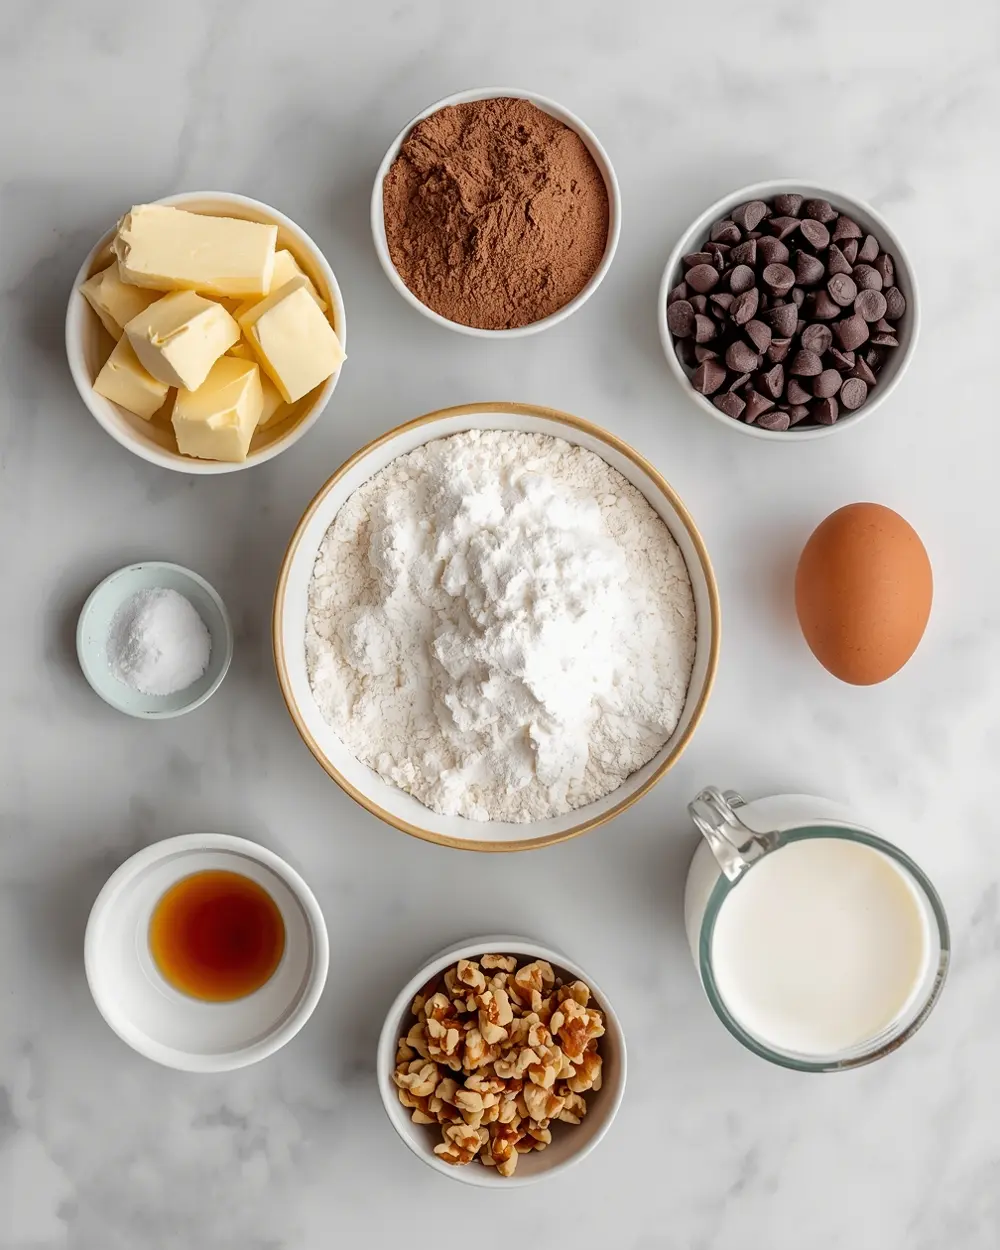
- 1/2 cup butter
- 1 cup granulated sugar
- 2 large eggs
- 1 tsp vanilla extract (alcohol-free)
- 1/2 cup unsweetened cocoa powder
- 1 cup all-purpose flour
- 1/4 tsp baking powder
- 1/4 tsp salt
- 1/4 cup milk
- 1/2 tsp espresso powder
- 1/2 cup chocolate chips
- 1/4 cup chopped walnuts
The espresso powder is my secret weapon for deepening that chocolate flavor without tasting like coffee. Trust me on this—you won’t detect espresso at all, just richer, more complex chocolate notes. If you skip the walnuts, the brownies turn out just as good, so don’t stress if you’re not a nut person.
Some people swap the walnuts for pecans or skip nuts entirely, which works perfectly fine. You can also use semi-sweet chocolate chips if you want less intensity, or go dark chocolate for serious chocolate lovers. Just avoid white chocolate chips because they don’t vibe with this recipe.
Step-by-step instructions
1. Preheat your oven to 350°F and grease an 8×8-inch baking pan. I line mine with parchment paper too, which makes it so easy to lift the whole pan of brownies out after baking. Tap the paper down in the corners so it doesn’t slide around while you’re mixing.
2. Melt the butter in a microwave-safe bowl for about 60 seconds, stirring halfway through. Once it’s melted, add the granulated sugar and stir until combined—it’ll look kinda gritty and that’s exactly what you want. This is where you’ll add both eggs and whisk them in really well.
3. Pour in the alcohol-free vanilla extract and milk, then whisk everything together until smooth. The mixture should look shiny and slightly thick at this point. Don’t skip the milk because it keeps the brownies from getting too dense.
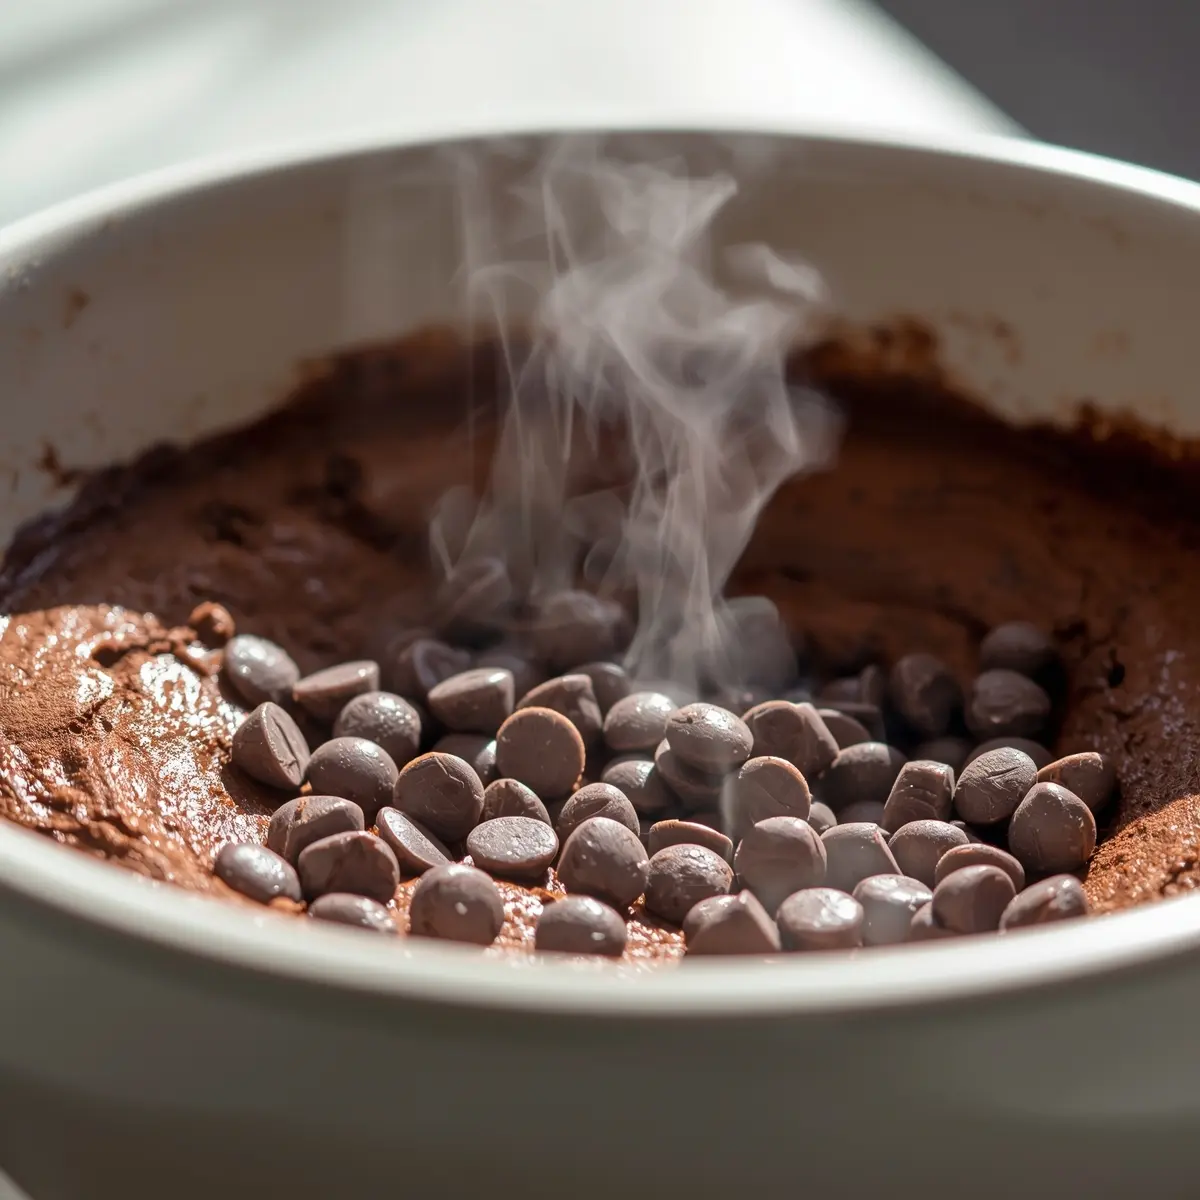
4. In a separate small bowl, whisk together the unsweetened cocoa powder, all-purpose flour, baking powder, salt, and espresso powder. Make sure there aren’t any cocoa lumps hiding in there—break them up with your whisk as you go. This prevents weird grainy spots in your finished brownies.
5. Add the dry ingredients to your wet mixture and fold together gently with a spatula until just combined. You want to see a few streaks of flour disappear, but don’t overmix it—that’s how you get tough brownies instead of fudgy ones. Fold in the chocolate chips and walnuts last.
6. Pour the batter into your prepared pan and spread it in an even layer. The batter will be thick and that’s perfect—use a spatula to smooth the top. Mine always sticks a little to the spatula and that’s completely fine.
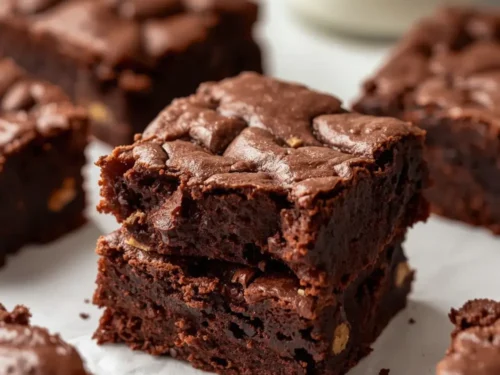
7. Bake for 28-32 minutes until a toothpick inserted in the center comes out with just a few moist crumbs clinging to it. Don’t pull them out when the toothpick comes out clean, or you’ll get cakey brownies instead of fudgy ones. Let them cool in the pan for 15 minutes, then transfer to a wire rack.
Serving ideas for chocolate brownies recipe
These brownies pair well with so many things beyond just eating straight from the container.
Vanilla Ice Cream Sandwich
Stack a warm brownie with a scoop of vanilla ice cream between two pieces. The cold creaminess against the warm fudgy chocolate is honestly unbeatable on a hot day. Takes your after school treat recipes to the next level.
Coffee and Brownie Combo
Pair these with a strong cup of coffee or espresso for maximum chocolate flavor amplification. The espresso powder in the brownie actually complements coffee perfectly, creating this rich chocolate experience. Plus, try pairing with our espresso coffee cake recipe for a complete dessert spread.
Brownie with Whipped Cream and Berries
Top a brownie with a dollop of whipped cream and fresh raspberries or strawberries. The tartness of the berries cuts through all that fudgy richness in the best way possible. It feels fancy but takes literally 30 seconds to assemble.
Pro tips for perfect chocolate brownies recipe
Storage tips
– Keep brownies in an airtight container at room temperature for up to 5 days – Stack them with parchment paper between layers so they don’t stick together – Refrigerate for longer shelf life, up to 10 days totalMake-ahead instructions
– Bake the brownies fully and freeze in an airtight container for up to 3 months – Thaw at room temperature for 2 hours before serving, no reheating needed – You can also freeze the batter and bake it straight from frozen (add 5-7 minutes)Variations
– Add 1/4 tsp mint extract for a minty fudgy flavor twist – Swirl in 2 tablespoons of peanut butter for brownie-PB bliss – Top with fleur de sel before baking for a sweet-salty combo that’s chef’s kissTroubleshooting
– If brownies turn out cakey, you overbaked them—pull them out 2 minutes earlier next time – If they’re too dense, you mixed the batter too much—fold gently instead – If the edges are crispy but the center is gooey, that’s actually the ideal brownie textureFrequently asked questions
Can you freeze chocolate brownies?
Yes, absolutely—freeze them in an airtight container for up to 3 months and they’ll taste just as good. Thaw at room temperature for about 2 hours and they’re ready to eat, no reheating required. Wrap them individually in plastic wrap first if you want to grab one without thawing the whole batch.
What’s the difference between fudgy and cakey brownies?
Fudgy brownies have more fat and less flour, plus they’re pulled from the oven while the center is still slightly underbaked. Cakey brownies bake longer and have a higher flour ratio, giving them that cake-like crumb. This recipe leans into fudgy territory because that’s where the magic happens.
How do you reheat brownies?
Wrap a brownie in a damp paper towel and microwave for 10-15 seconds to warm it without drying it out. Or pop it in a 300°F oven for 5 minutes wrapped in foil, which keeps moisture locked in. Either way, you’ll get that warm fudgy texture back.
Can you make these brownies with different chocolate chips?
Semi-sweet, dark, or milk chocolate chips all work perfectly in this recipe. Dark chocolate makes them richer and less sweet, while milk chocolate keeps them more dessert-forward and indulgent. Use whatever type you have on hand—honestly they’re hard to mess up.
Final thoughts
These chocolate brownies recipe deliver restaurant-quality fudgy texture in less than an hour. No special skills required, just one bowl and basic ingredients you already have.
The best part? You can literally make them any night and feel like you accomplished something. They also stay fresh for days, so baking a batch means dessert sorted for the whole week.
Once you nail this recipe, you’ll want to explore other easy baking recipes that are equally foolproof. These brownies are always the first thing to disappear at potlucks, so go ahead and make an extra batch. Pin this for later and impress yourself this week.
Chocolate Brownies Fudgy Rich and One Bowl Easy
Ingredients
Method
- Preheat your oven to 350°F and grease an 8×8-inch baking pan. I line mine with parchment paper too, which makes it so easy to lift the whole pan of brownies out after baking. Tap the paper down in the corners so it doesn’t slide around while you’re mixing.
- Melt the butter in a microwave-safe bowl for about 60 seconds, stirring halfway through. Once it’s melted, add the granulated sugar and stir until combined—it’ll look kinda gritty and that’s exactly what you want. This is where you’ll add both eggs and whisk them in really well.
- Pour in the alcohol-free vanilla extract and milk, then whisk everything together until smooth. The mixture should look shiny and slightly thick at this point. Don’t skip the milk because it keeps the brownies from getting too dense.
- In a separate small bowl, whisk together the unsweetened cocoa powder, all-purpose flour, baking powder, salt, and espresso powder. Make sure there aren’t any cocoa lumps hiding in there—break them up with your whisk as you go. This prevents weird grainy spots in your finished brownies.
- Add the dry ingredients to your wet mixture and fold together gently with a spatula until just combined. You want to see a few streaks of flour disappear, but don’t overmix it—that’s how you get tough brownies instead of fudgy ones. Fold in the chocolate chips and walnuts last.
- Pour the batter into your prepared pan and spread it in an even layer. The batter will be thick and that’s perfect—use a spatula to smooth the top. Mine always sticks a little to the spatula and that’s completely fine.
- Bake for 28-32 minutes until a toothpick inserted in the center comes out with just a few moist crumbs clinging to it. Don’t pull them out when the toothpick comes out clean, or you’ll get cakey brownies instead of fudgy ones. Let them cool in the pan for 15 minutes, then transfer to a wire rack.
")