

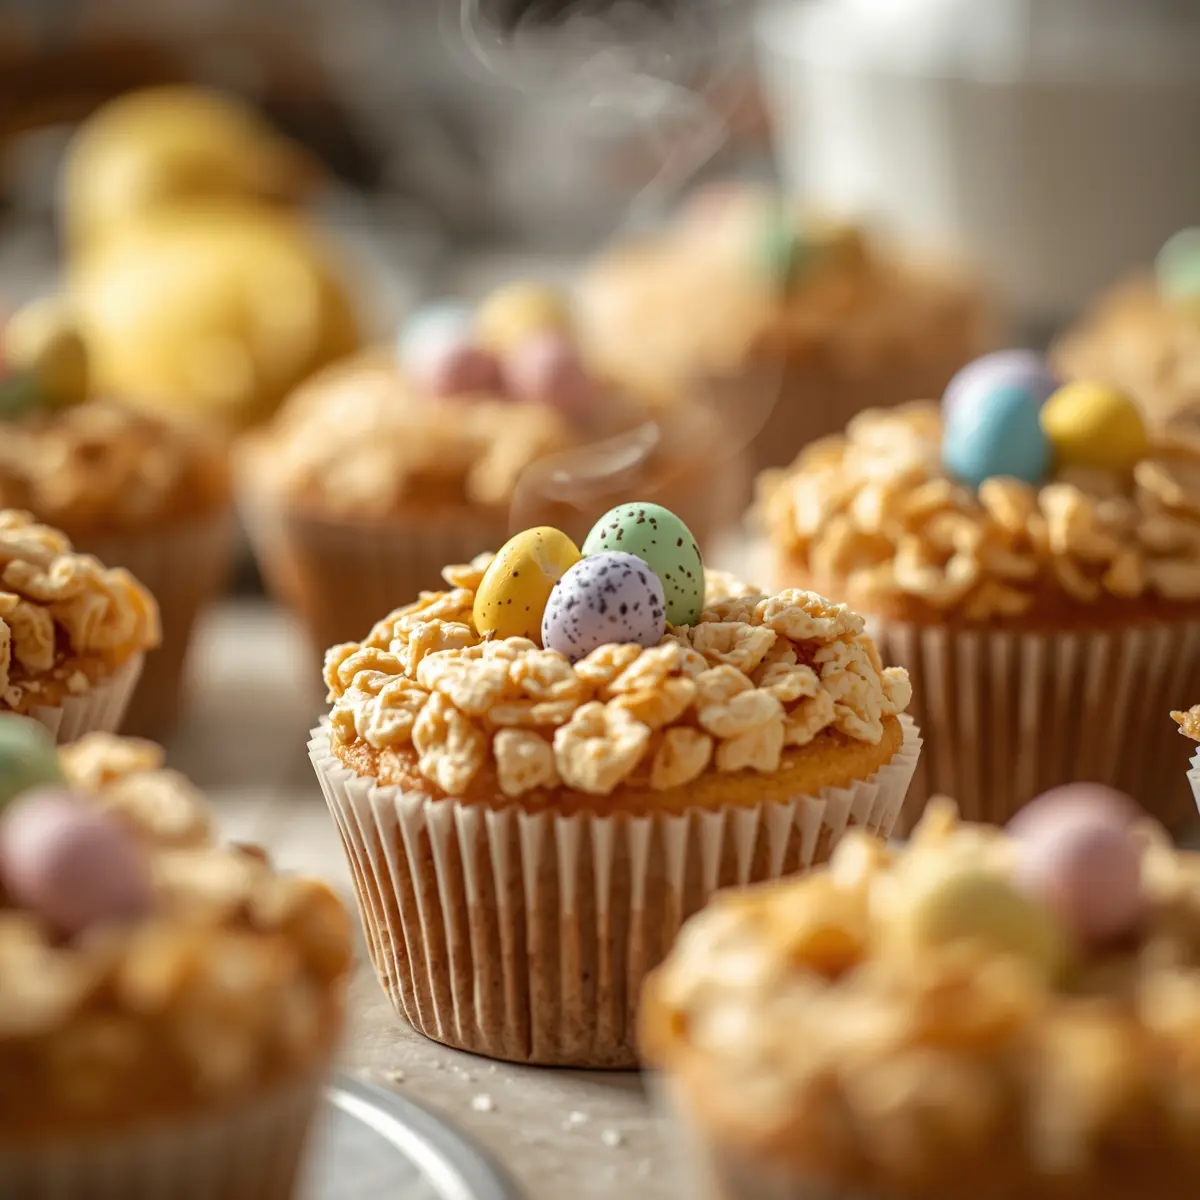
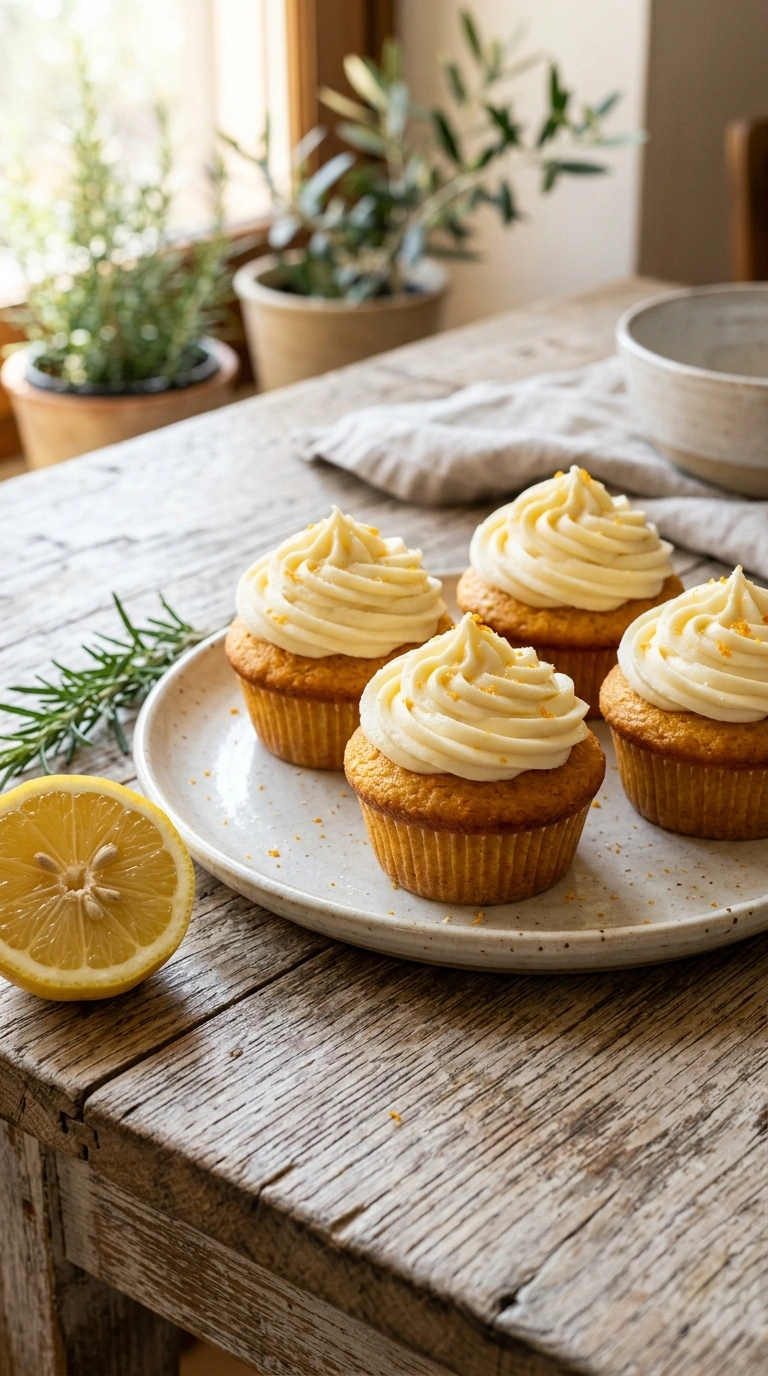
Easter nest cupcakes are seriously the cutest way to celebrate spring baking with kids this season. I made these for my daughter’s classroom party last year and they disappeared in minutes—plus the kids got so excited decorating them. Want an easy Easter cupcake idea that looks fancy but takes under 40 minutes total? These are it.
Unlike complicated holiday desserts, this bird nest dessert comes together fast and tastes amazing. You’ll have tender vanilla cupcakes topped with a crispy, sweet nest made from cereal and honey. The best part? Kids can help with every step, making it perfect for family baking time.
We’ve even got more spring baking ideas you’ll love. Bookmark this Easter cupcake recipe for your holiday party or Easter morning brunch. The mini chocolate eggs on top make them Instagram-worthy without extra effort.
Why this Easter nest cupcakes recipe works
Ever notice how some Easter party treats look complicated but actually come together super easily? I tested this a few times because I wanted the perfect balance of soft cupcake and crispy nest topping. Here’s why these holiday cupcakes work so well:
- Soft vanilla cake base that stays moist for 2-3 days without drying out
- Cereal topping creates authentic nest texture without special ingredients or tools needed
- Kids love decorating with tiny chocolate eggs and edible elements in minutes
- Ready-to-serve in under 40 minutes total from start to finish
| Prep Time | Cook Time | Calories | Servings | Cuisine |
|---|---|---|---|---|
| 20 minutes | 18 minutes | 185 per serving | 12 cupcakes | American |
Ingredients for Easter nest cupcakes
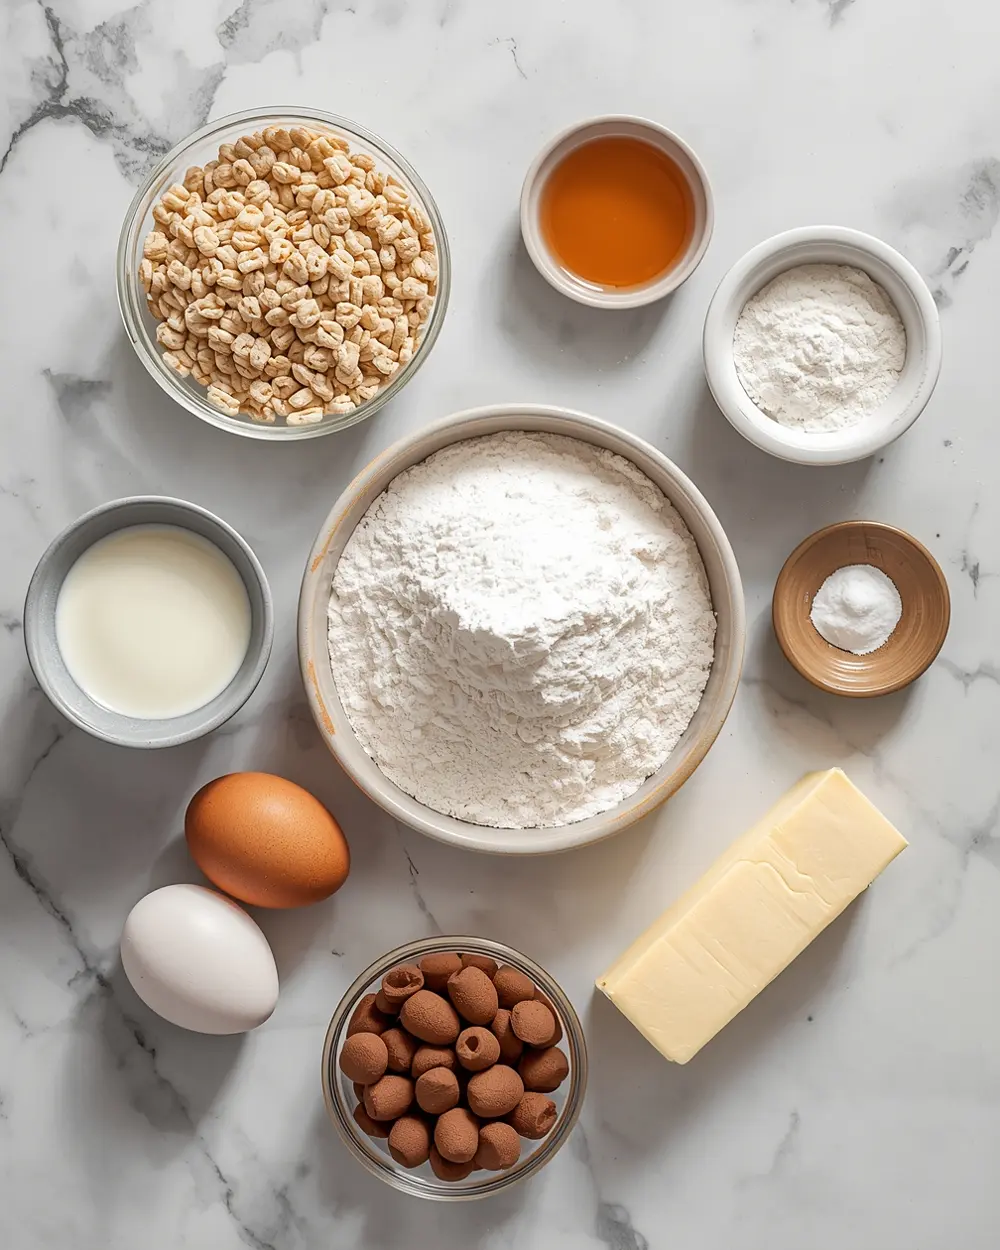
- 1 cup all-purpose flour
- 1/2 cup granulated sugar
- 1/4 cup butter
- 2 large eggs
- 1/2 cup milk
- 1 teaspoon vanilla powder
- 1 teaspoon baking powder
- 1/4 teaspoon salt
- 1/2 cup shredded wheat cereal
- 2 tablespoons honey
- 1/4 cup mini chocolate eggs
- 2 tablespoons melted butter
Honestly, you can swap the shredded wheat cereal for crushed chow mein noodles or even crispy fried onions if you want. The honey helps bind everything together, so don’t skip it—that’s what makes the nest actually stick on top instead of falling off. I’ve tried Easter nest cupcakes with different mix-ins and the cereal version wins every time.
Some people use store-bought frosting to save time, and that’s totally fine. Just spread a thin layer on each cooled cupcake before adding your nest topping. Trust me, nobody’s gonna judge you for using shortcuts on busy holiday baking days.
Step-by-step instructions
1. Preheat your oven to 350°F and line a 12-cup muffin tin with paper liners. Cream together the butter and sugar until it’s light and fluffy—this takes about 2 minutes with a mixer. You’ll see the mixture get pale and fluffy, which means you’re incorporating air into the batter. This step matters because it helps your Easter nest cupcakes rise perfectly.
2. Beat in the eggs one at a time, mixing well after each addition. Add the vanilla powder and stir until combined. Pour in half the milk, then add your flour mixture (flour, baking powder, and salt whisked together). Stir gently, then add the rest of the milk and mix until just combined—don’t overmix or you’ll get tough cupcakes.
3. Divide the batter evenly among the 12 paper liners, filling each about two-thirds full. Tap the muffin tin on the counter a couple times to release air bubbles. Bake for 15-18 minutes until a toothpick inserted in the center comes out clean or just barely moist.
4. Let the cupcakes cool in the pan for 5 minutes, then transfer them to a wire rack. They need to cool completely before you add the frosting—this prevents everything from melting together. I learned this the hard way by trying to frost warm cupcakes once (total mess).
5. While cupcakes cool, prepare your nest topping by crushing the shredded wheat cereal into bite-sized pieces. Don’t make them too fine—you want texture that looks like actual twigs. Mix the crushed cereal with 2 tablespoons melted butter and 2 tablespoons honey in a small bowl until everything’s coated and clumpy.
6. Spoon about 1 tablespoon of the cereal mixture onto the top of each cooled cupcake, pressing gently so it sticks. The honey and butter act like glue here, so don’t skip that step. Work quickly before the mixture hardens, and your Easter nest cupcakes will look professionally decorated.
7. Press 3-4 mini chocolate eggs into each nest and let everything set for 10 minutes. Serve immediately or store in an airtight container for up to 2 days. They’re best enjoyed the same day you make them, but honestly they’re still delicious on day two.
Serving ideas for Easter nest cupcakes
These spring baking treats shine when paired with the right beverages and sides for your holiday gathering.
Milk and cookies combo
Serve each cupcake alongside a small glass of cold milk and a simple sugar cookie. Kids absolutely love this pairing because it feels like a complete little snack, and the milk cools down any sweetness from the chocolate eggs.Coffee and Easter brunch spread
Pair these Easter cupcake ideas with a hot cup of coffee for an elegant brunch setup. Add fresh berries, pastries, and a fruit salad around them on your dessert table for a full spring breakfast moment.Lemonade and spring picnic
Bundle these bird nest desserts with cold homemade lemonade and fresh-baked brownies for an outdoor Easter party. The light vanilla flavor balances beautifully with tart lemonade, making it perfect for afternoon celebrations.Pro tips for perfect Easter nest cupcakes
Storage tips
– Keep cooled cupcakes in an airtight container at room temperature for up to 2 days – Store in the fridge if your kitchen’s really warm to prevent frosting from getting soft – Don’t freeze decorated cupcakes—the cereal topping gets soggy when thawedMake-ahead instructions
– Bake cupcakes a full day before your party and store unfrosted in a container – Prepare your cereal mixture up to 4 hours ahead in a sealed container – Assemble the complete Easter nest cupcakes no more than 3 hours before serving for best appearanceVariations
– Use crushed pretzels instead of cereal for a sweet-salty twist that guests love – Add edible gold leaf to the honey mixture for fancy holiday cupcake decorating – Try pastel-colored frosting under the nest topping for more springtime appealTroubleshooting
– If your cereal topping slides off, the honey mixture wasn’t sticky enough—add more honey next time – Cupcakes taste dry? You probably overbaked them—start checking at minute 15 instead of 18 – Nest mixture hardened before you finished? Microwave it for 10 seconds to soften it back upFrequently asked questions
Can I freeze Easter nest cupcakes?
Yes, freeze unfrosted cupcakes in an airtight container for up to 2 months. *Add the cereal nest topping and chocolate eggs on the day you serve them* for the best texture. This makes holiday prep so much easier when you’re planning ahead.What can I use instead of shredded wheat cereal?
Crushed chow mein noodles, crispy fried onions, or even crushed Chex cereal work great. Each version creates a slightly different texture, so pick whatever sounds good to you. The honey-butter mixture holds everything together regardless of which cereal you choose.How do I reheat leftover Easter nest cupcakes?
Just eat them cold—reheating makes the cereal topping get soggy and ruins the texture. If you really want them warm, microwave individual cupcakes for 10-15 seconds, but honestly they taste better at room temperature.Are these Easter nest cupcakes kid-friendly for spring baking with kids?
Absolutely, and kids can help with almost every step! Let them help mix ingredients, crush the cereal, and press chocolate eggs into the nests. This recipe is perfect for family baking days because it’s forgiving and super fun to decorate together.Final thoughts
These Easter nest cupcakes are hands-down the easiest holiday dessert I make every spring. My family requests them constantly, and friends always ask for the recipe after one bite. The combo of soft vanilla cake, crispy cereal topping, and cute chocolate eggs just works perfectly together.
Looking for more holiday baking inspiration? Check out our collection of Easter party treats that are equally impressive but simple to make. Pin this recipe for next year’s celebration, and you’ll have the cutest dessert at your Easter table.
Your guests won’t believe you made these adorable treats from scratch—that’s the beauty of having an easy recipe that looks fancy. Honestly, making these has become my Easter tradition, and I hope they become part of yours too.

Easter Nest Cupcakes Adorable and Easy to Make
Ingredients
Method
- Preheat your oven to 350°F and line a 12-cup muffin tin with paper liners. Cream together the butter and sugar until it’s light and fluffy—this takes about 2 minutes with a mixer. You’ll see the mixture get pale and fluffy, which means you’re incorporating air into the batter. This step matters because it helps your Easter nest cupcakes rise perfectly.
- Beat in the eggs one at a time, mixing well after each addition. Add the vanilla powder and stir until combined. Pour in half the milk, then add your flour mixture (flour, baking powder, and salt whisked together). Stir gently, then add the rest of the milk and mix until just combined—don’t overmix or you’ll get tough cupcakes.
- Divide the batter evenly among the 12 paper liners, filling each about two-thirds full. Tap the muffin tin on the counter a couple times to release air bubbles. Bake for 15-18 minutes until a toothpick inserted in the center comes out clean or just barely moist.
- Let the cupcakes cool in the pan for 5 minutes, then transfer them to a wire rack. They need to cool completely before you add the frosting—this prevents everything from melting together. I learned this the hard way by trying to frost warm cupcakes once (total mess).
- While cupcakes cool, prepare your nest topping by crushing the shredded wheat cereal into bite-sized pieces. Don’t make them too fine—you want texture that looks like actual twigs. Mix the crushed cereal with 2 tablespoons melted butter and 2 tablespoons honey in a small bowl until everything’s coated and clumpy.
- Spoon about 1 tablespoon of the cereal mixture onto the top of each cooled cupcake, pressing gently so it sticks. The honey and butter act like glue here, so don’t skip that step. Work quickly before the mixture hardens, and your Easter nest cupcakes will look professionally decorated.
- Press 3-4 mini chocolate eggs into each nest and let everything set for 10 minutes. Serve immediately or store in an airtight container for up to 2 days. They’re best enjoyed the same day you make them, but honestly they’re still delicious on day two.


")