
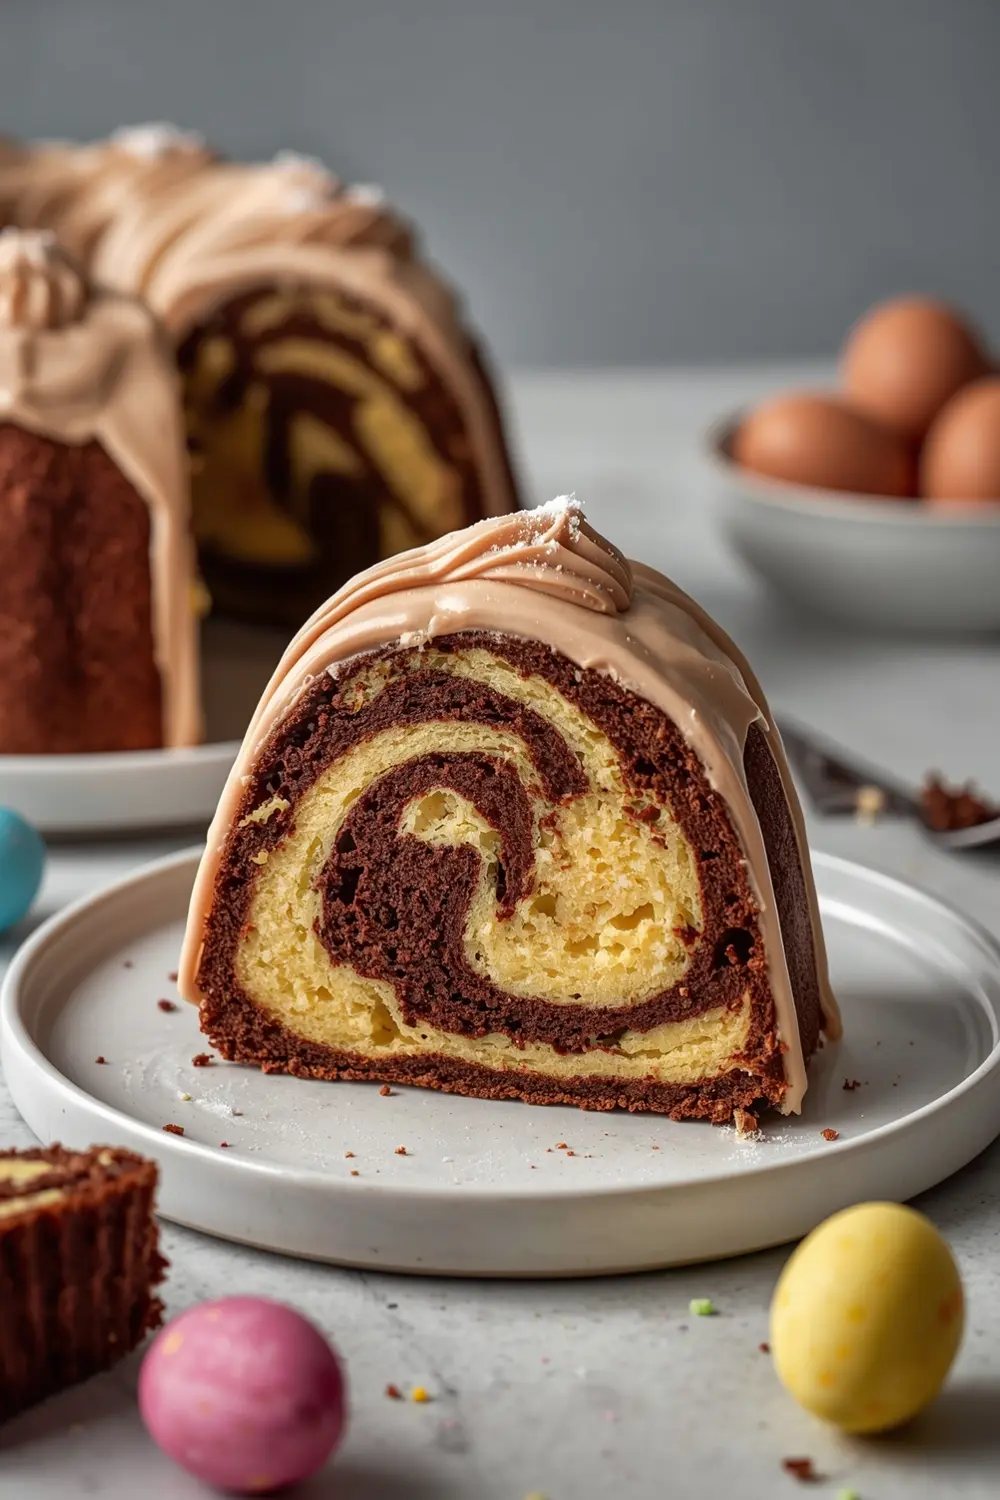
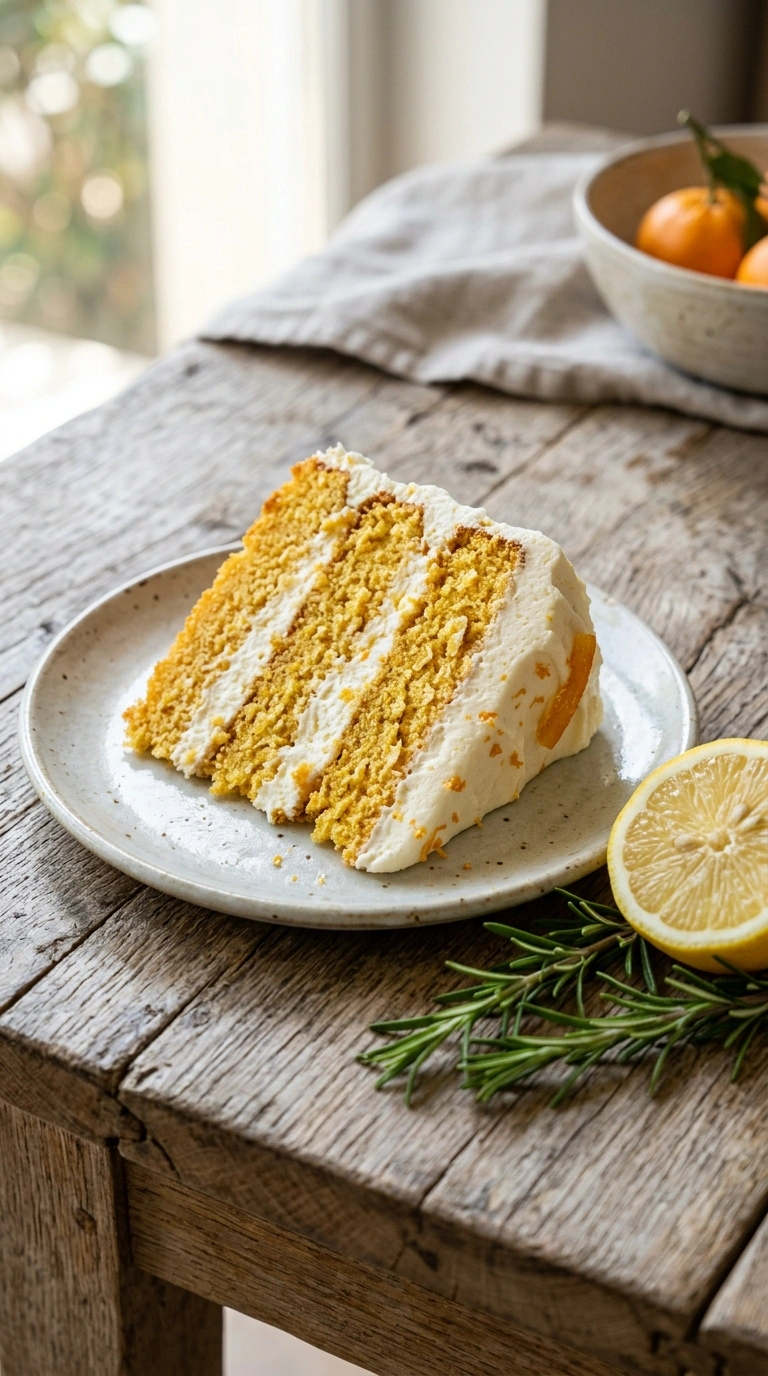
Easter marble cake recipe isn’t just another dessert—it’s the show-stopper that’ll have everyone asking for your secrets. I’m talking about those gorgeous chocolate and vanilla swirls that look like you spent hours in a professional kitchen. Honestly, making this stunning cake is way easier than people think, and I’m here to prove it.
The best part? You’ll have this beauty ready in just over an hour from start to finish. Plus, those marbled swirls make every slice look Instagram-worthy without any fancy decorating skills needed. If you’re hunting for Easter baking ideas that impress without stress, bookmark this recipe for your holiday lineup.
Why this Easter marble cake recipe works
Ever wonder why some cakes stay dry and boring while others turn out moist and flavorful? This version keeps that perfect balance by mixing yogurt into the batter, which means every single bite stays tender even days later.
- Soft, moist crumb that doesn’t dry out—yogurt is the secret weapon here
- Beautiful chocolate vanilla contrast—minimal effort, maximum visual impact
- Ready in 65 minutes total—perfect for busy weeknight baking or last-minute entertaining
- Uses simple pantry ingredients—no weird substitutions or specialty items needed
| Prep Time | Cook Time | Calories | Servings | Cuisine |
|---|---|---|---|---|
| 20 minutes | 45 minutes | 285 per serving | 12 servings | American |
Ingredients for Easter marble cake recipe
- 2 cups all-purpose flour
- 1 cup granulated sugar
- 1/2 cup unsalted butter, softened
- 4 large eggs
- 1 cup whole milk
- 2 teaspoons baking powder
- 1/2 teaspoon salt
- 1/4 cup unsweetened cocoa powder
- 1 teaspoon vanilla extract
- 1/2 cup plain yogurt
- 1/4 cup melted butter
- 1 tablespoon olive oil
You can swap out regular milk for buttermilk if you want an even tangier crumb—it’s honestly my go-to when I have it on hand. The olive oil keeps things moist, but you could use coconut oil or vegetable oil without major changes to the flavor.
Don’t skip the yogurt here (trust me on this). It’s what transforms this from a standard chocolate vanilla cake into something that stays soft for days. Some people use sour cream instead, and that works great too if that’s what you’ve got.
Step-by-step instructions
1. Preheat your oven to 350°F and grease a 9×13-inch baking pan really well with that tablespoon of olive oil. Mix together your 2 cups flour, 2 teaspoons baking powder, and 1/2 teaspoon salt in a separate bowl and set it aside. This step takes literally 2 minutes but makes the rest so much easier.
2. Cream together your 1/2 cup softened butter and 1 cup sugar until it’s light and fluffy—you’ll see it get pale and kinda fluffy, which takes about 3 minutes with an electric mixer. Add your 4 eggs one at a time, mixing after each one so everything combines smoothly. Don’t rush this part because it adds air into the batter.
3. Alternate adding your dry ingredients and wet ingredients (milk and yogurt mixed together) to the butter mixture, starting and ending with the dry stuff. Mix on low speed until just combined—don’t overmix or you’ll end up with a tough cake. The batter should look smooth but not overworked.
4. Pour about two-thirds of your batter into the prepared pan and spread it out evenly. In a separate small bowl, mix the remaining batter with your 1/4 cup cocoa powder and 1/4 cup melted butter until you get that rich chocolate color. This chocolate batter is thinner, so it’ll be easier to drizzle.
5. Drop spoonfuls of the chocolate batter all over the vanilla layer—don’t worry about perfect spacing because that’s literally the point of marble cake. Use a knife to gently swirl through both layers about 8-10 times, being careful not to overmix them together completely. You want those beautiful streaks, not brown cake.
6. Slide the pan into your preheated oven and bake for 42-45 minutes until a toothpick inserted in the center comes out with just a few moist crumbs. The top should look set and lightly golden, and you’ll notice the edges pulling away from the sides just slightly. Don’t panic if the center still looks a tiny bit soft—it’ll set as it cools.
7. Let your Easter marble cake recipe cool in the pan for about 15 minutes, then turn it out onto a wire rack to cool completely. I always let mine sit for at least an hour before slicing because it’s way easier to cut when it’s fully cooled. The marble pattern becomes even more beautiful as it sets up.
Serving ideas for Easter marble cake recipe
This cake is stunning on its own, but a few simple pairings make it absolutely perfect for your Easter table.
Fresh whipped cream and berries
Top each slice with a dollop of whipped cream and a handful of fresh strawberries or raspberries to keep things springy and bright. The tartness of berries balances the sweetness perfectly, and it looks like you spent way more time than you actually did on presentation.
Vanilla or chocolate frosting
A simple buttercream frosting smoothed over the top adds elegance without covering up those gorgeous swirls—just keep it thin. You could also drizzle chocolate vanilla cake toppings for that extra indulgence your guests will love.
Coffee or tea pairing
Serve each slice with a hot cup of coffee, tea, or hot chocolate for the ultimate cozy springtime moment. The mild flavor of this cake pairs beautifully with both bold and delicate beverages without competing for attention.
Pro tips for perfect Easter marble cake recipe
Storage tips
– Keep covered at room temperature for up to 3 days—the yogurt keeps it fresher longer
– Wrap slices individually in plastic wrap to prevent drying out faster
– Store in an airtight container away from strong-smelling foods
Make-ahead instructions
– Bake completely and cool the night before your Easter gathering
– Frost or add toppings the morning of for maximum freshness
– The batter can sit covered in the fridge for up to 2 hours before baking
Variations
– Swap chocolate for espresso powder for a mocha twist that’s super sophisticated
– Add 1/2 teaspoon almond extract to the vanilla portion for subtle depth
– Create a lemon-chocolate marble by adding lemon zest to the vanilla batter
Troubleshooting
– If the top cracks, don’t worry—that’s totally normal and doesn’t affect taste at all
– Dense texture means you overmixed the batter, so go easier next time with folding
– Dry cake usually means you either overbaked it or skipped the yogurt step entirely
Frequently asked questions
Can you freeze Easter marble cake recipe?
Yes, absolutely—wrap cooled slices tightly in plastic wrap and freeze for up to 3 months. Thaw them at room temperature for about an hour before serving, and they’ll taste almost like fresh-baked again.
What if I don’t have yogurt on hand?
You can use sour cream in equal amounts, or replace half the yogurt with extra milk if needed. The cake won’t be quite as moist, but it’ll still turn out delicious and beautiful.
How do you reheat leftover slices?
Microwave individual slices for 15-20 seconds to take the chill off, or wrap them in foil and warm in a 300°F oven for about 10 minutes. I honestly prefer mine at room temperature because the flavors really shine through better that way.
Can you make this as a spring swirl cake without the chocolate?
Totally—just skip the cocoa powder and make two batches of vanilla batter with different food coloring instead. You’ll get that same gorgeous marble effect with a white-and-pastel look perfect for spring entertaining.
Final thoughts
This Easter marble cake recipe honestly changed my approach to holiday baking because it proved you don’t need fancy techniques to look fancy. I’ve made this at least 15 times for various gatherings, and every single time someone asks if I bought it from a bakery (I don’t correct them anymore). The secret is just that gorgeous marble pattern combined with the moist texture from yogurt.
Want to expand your Easter dessert lineup? Check out these other holiday dessert pretty options that work just as beautifully for your spring table. Your family’s gonna love this one, and you’ll love how easy it actually is.
Save this recipe now for your next celebration—trust me, you’ll be making it again and again. Happy baking!
")