
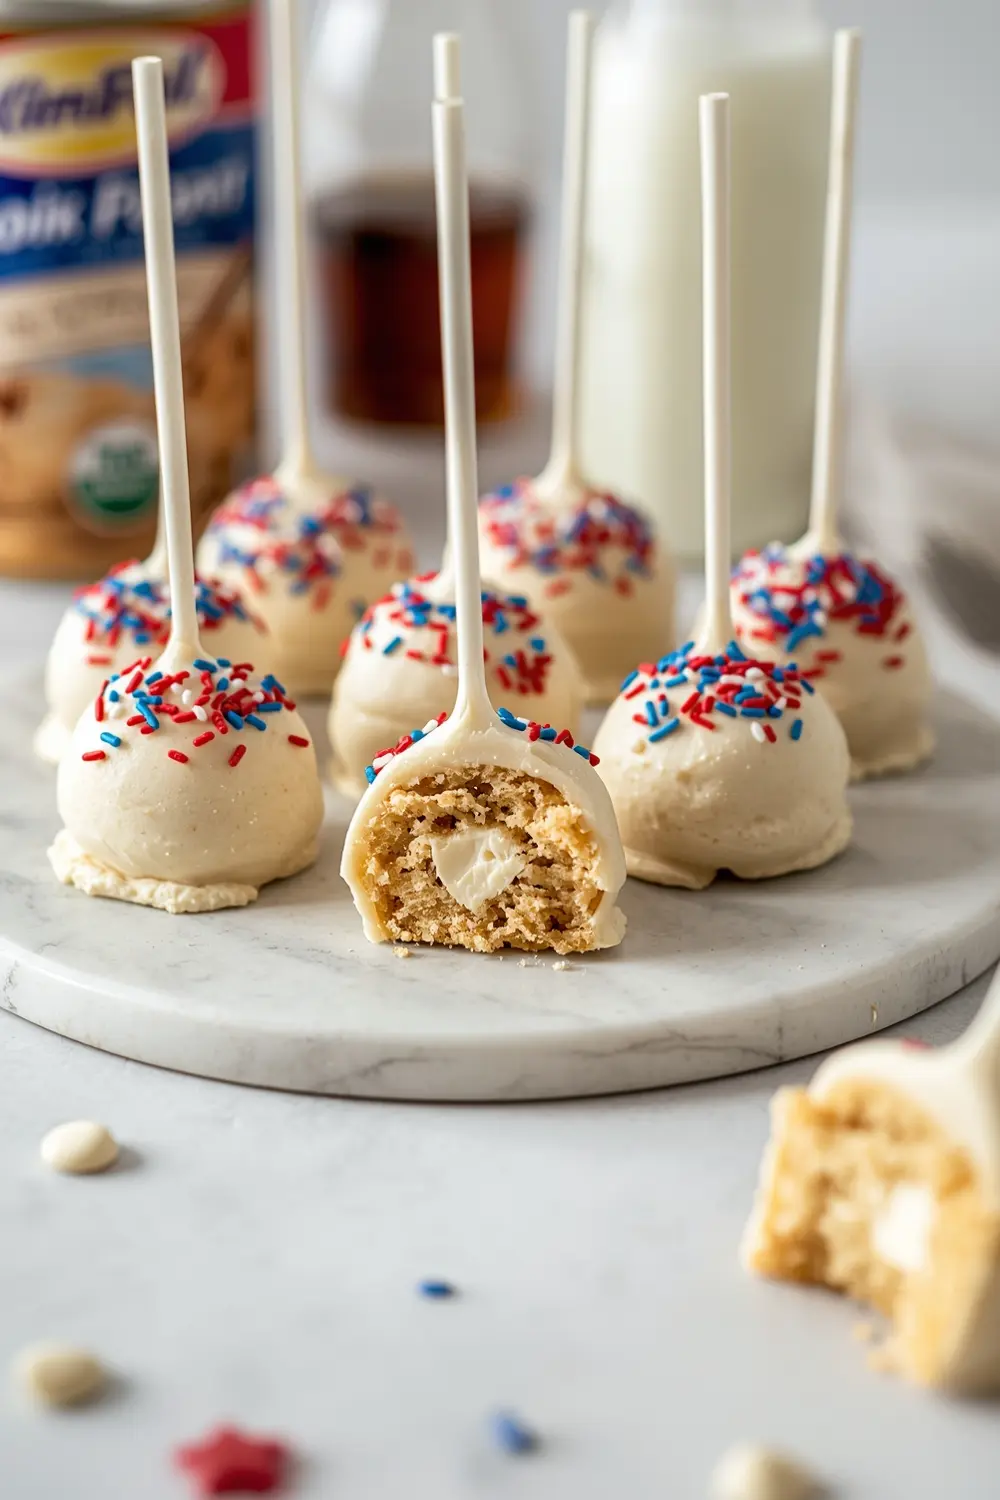
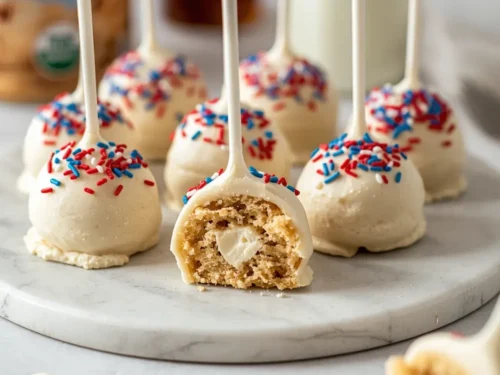
Making patriotic cake pops 4th july used to intimidate me until I realized they’re honestly just cake crumbs mixed with frosting. The first time I made them, I burned my initial batch because I walked away while the cake was baking, but now they’re my go-to dessert for every summer gathering.
These little bites hit different when you bite into that white chocolate coating and see the red, white, and blue colors inside. Save this recipe for your next patriotic party—your guests will be seriously impressed.
Want to impress at your next celebration? These elegant summer entertaining treats come together faster than you’d think, and everyone always asks for the recipe. Plus, you can make them days ahead, so there’s way less stress on game day.
Check out my Easter strawberry trifle if you love layered desserts that taste as good as they look.
Why this patriotic cake pops 4th july works
Ever notice how store-bought cake pops taste kinda dry and boring? These homemade patriotic cake pops 4th july are packed with buttery flavor and that perfect creamy center. I tested three different frosting amounts, and this ratio hits the sweet spot every single time.
- Soft, moist cake that stays tender even after decorating
- Easy no-bake assembly once your cake is ready and cooled
- Customizable colors so you can match any summer entertaining theme
- Make-ahead friendly since they freeze beautifully for up to two weeks
| Prep Time | Cook Time | Calories | Servings | Cuisine |
|---|---|---|---|---|
| 45 minutes | 25 minutes | 185 per serving | 24 cake pops | American |
Ingredients for patriotic cake pops 4th july

- 1 cup all-purpose flour
- 1/2 cup granulated sugar
- 1/2 cup unsalted butter, softened
- 2 large eggs
- 1/2 tsp baking powder
- 1/4 tsp salt
- 1/2 cup milk
- 1 tsp vanilla extract
- 8 oz cream cheese, softened
- 1 cup white chocolate melts
- 1/2 cup red sprinkles
- 1/2 cup blue sprinkles
- 1 tbsp vegetable oil
- 1 cup white chocolate chips
Can’t find white chocolate melts? Regular white chocolate chips work just fine—they’ll melt the same way. I personally use the melts because they’re faster, but honestly either one creates that smooth coating.
Some people add extra butter to their frosting, but I keep it simple with the cream cheese ratio I’ve got here. Don’t skip the vegetable oil when melting your white chocolate—it keeps everything from getting too thick and sticky, plus it helps with that perfect glossy finish.
Step-by-step instructions
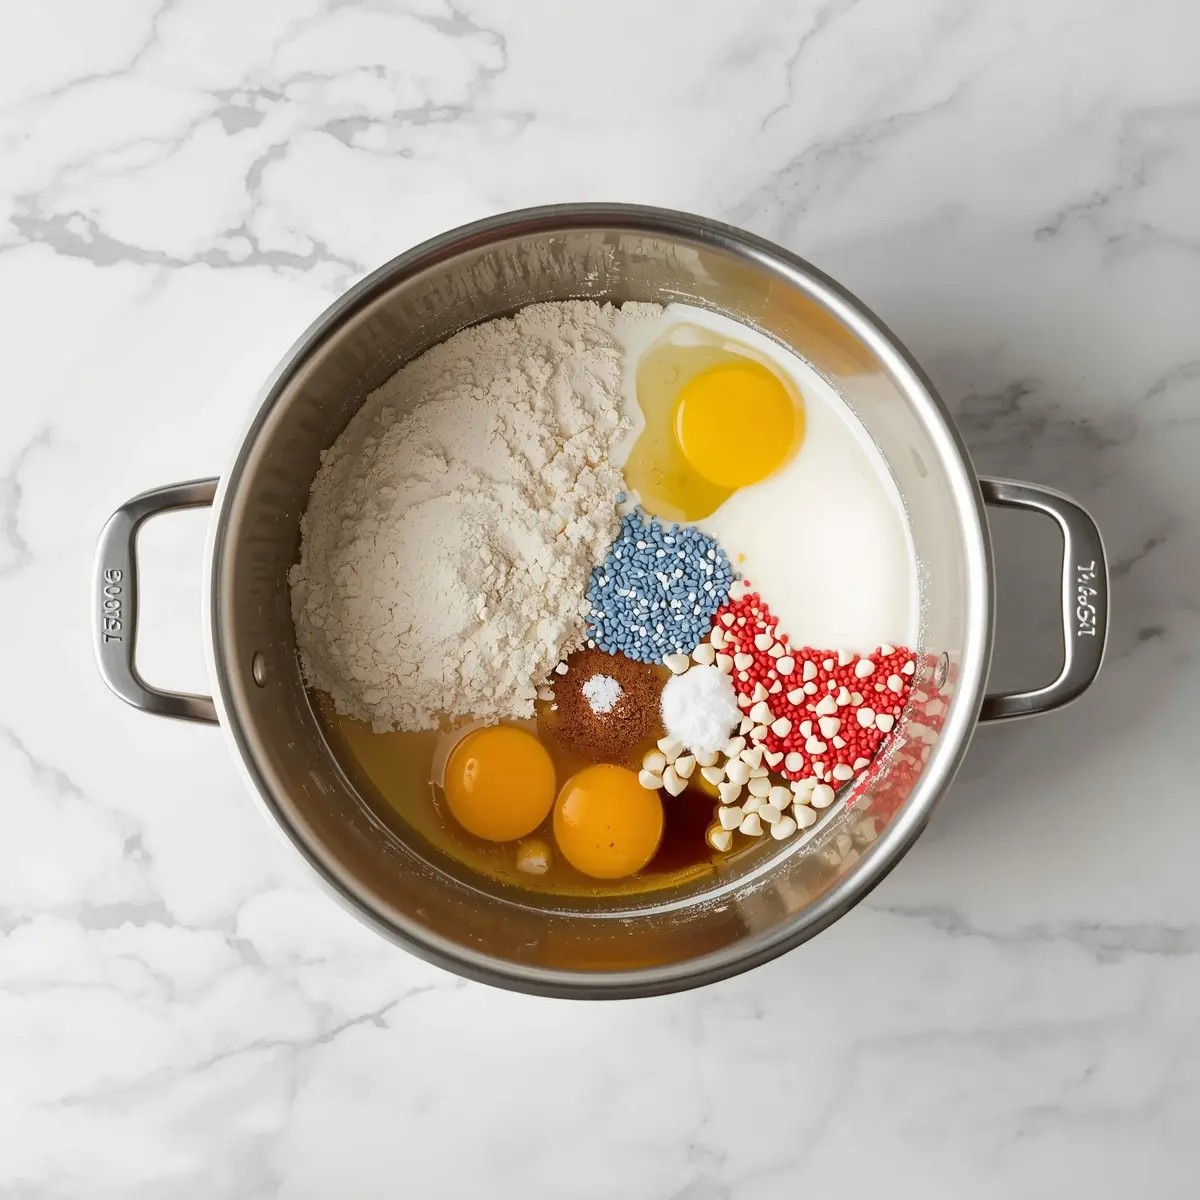
1. Preheat your oven to 350°F and line a 9-inch round cake pan with parchment paper. Whisk together flour, baking powder, and salt in a small bowl—set it aside. In another bowl, cream the softened butter and sugar together for about 2 minutes until it’s light and fluffy. This step matters because it adds air to your cake.
2. Add eggs one at a time to your butter mixture, beating well after each addition. Pour in the vanilla extract and mix until everything’s combined. Alternate adding your flour mixture and milk to the wet ingredients, starting and ending with flour. Stir until you don’t see any white streaks—don’t overmix or your cake gets tough.
3. Pour batter into your prepared pan and bake for 22-25 minutes until a toothpick inserted in the center comes out clean. Let the cake cool completely in the pan for about 10 minutes, then turn it out onto a wire rack. I always let mine cool completely before crumbling because warm cake falls apart in all the wrong ways.
4. Once cooled, crumble your entire cake into a large mixing bowl—you want fine crumbs, almost like breadcrumbs. Beat the softened cream cheese until it’s smooth, then fold it gently into your crumbs until everything’s combined and holds together when squeezed. You’re basically making edible dough at this point, which is honestly so satisfying.
5. Roll your mixture into 24 balls about the size of walnuts and place them on a parchment-lined baking sheet. Pop them in the freezer for at least 30 minutes—this is non-negotiable because cold cake pops won’t fall off your stick. While they’re freezing, insert your lollipop sticks halfway into each ball so they’re ready to dip.
6. Melt your white chocolate chips with the vegetable oil in a microwave-safe bowl, heating in 30-second bursts and stirring between each one. Keep an eye on it after the second burst because white chocolate burns faster than you’d think. Once melted, let it cool for about 2 minutes so it’s warm but not scorching hot.
7. Dip each cold cake pop into the melted chocolate, then immediately roll it in either red or blue sprinkles to create your patriotic pattern. Stand them upright in a foam block or small vase to set, then swap some with the other color sprinkles for that classic red, white, and blue look. They’ll firm up in about 10 minutes at room temperature.
Serving ideas for patriotic cake pops 4th july
These colorful bites deserve to be front and center on your summer entertaining table.
Alongside red, white, and blue trifle
Pair these with a red white blue trifle for a patriotic dessert spread that looks absolutely stunning. The cake pops are perfect one-handed bites while guests dig into the trifle with a spoon, giving you variety in texture and serving style.
With vanilla ice cream
Set out a small bowl of vanilla ice cream near your patriotic cake pops 4th july display so guests can take one with a scoop on the side. The cold ice cream melts into the warm cake, creating this unexpected creamy richness that honestly takes them to the next level.
On a dessert table with lemonade
Create a full summer entertaining station by arranging these pops with fresh lemonade, berry bites, and other finger desserts. The bright colors of the sprinkles look incredible photographed next to pale pink lemonade—totally Instagram-worthy without trying too hard.
Pro tips for perfect patriotic cake pops 4th july
Storage tips
– Keep finished pops in an airtight container at room temperature for up to 5 days – Refrigerate them if your kitchen’s warm or you’re not serving immediately – They stack nicely without sticking if you use parchment between layersMake-ahead instructions
– Bake and crumble your cake up to 2 days before mixing with frosting – Roll all your balls and freeze overnight—even better texture when you dip – Make the entire batch 3 days ahead and store in the fridge sealed up tightVariations
– Swap red and blue sprinkles for rainbow sprinkles if you want more summery vibes – Use food coloring to tint the white chocolate coating instead of sprinkles – Add 2 tablespoons cocoa powder to your cake for chocolate patriotic cake popsTroubleshooting
– If coating’s too thick, add another tablespoon of oil and stir until it’s thinner – Cake balls falling off the stick means they weren’t frozen long enough—pop them back in – Sprinkles not sticking means the chocolate cooled too much—reheat gently for 15 secondsFrequently asked questions
Can you freeze patriotic cake pops 4th july?
Yes, absolutely—they freeze beautifully for up to 2 weeks in an airtight container. Just thaw them at room temperature for about 15 minutes before serving and they taste exactly like you just made them. I always freeze extras because it takes the pressure off if anyone asks for seconds.
What if I don’t have a cake pop maker?
You don’t need one—I’ve never used one for this recipe and neither should you. Rolling them by hand gives you way more control over the size, plus your hands are already dirty from mixing the frosting anyway.
Can you use store-bought cake?
Totally, if you’re crunched for time—use about 3 cups of crumbled cake from your favorite bakery. Just make sure it’s not too moist or your mixture won’t hold together properly. Store-bought cake works in a pinch, but homemade tastes noticeably better (trust me on this).
Are these good for kids’ parties?
These make amazing treats for any celebration where kids are eating—not too big, perfectly sweet, and fun to decorate. My 6-year-old ate three at our last party and asked if I could make them for her birthday.
Final thoughts
These patriotic cake pops 4th july aren’t just pretty—they’re genuinely delicious and seriously easy to pull together. The combination of soft cake, creamy frosting, and smooth chocolate coating makes them a total crowd-pleaser every single time.
Plus, making them actually feels fun instead of stressful (which is rare for dessert projects, honestly). Your guests will assume you spent hours on these when really you’re just mixing, rolling, and dipping.
Want more elegant patriotic treats? Check out my Easter simnel cake recipe for layered dessert inspiration that impresses without the fuss. Pin this recipe for your next summer gathering and bookmark it now so you’ve got it ready when July hits.
Elegant Patriotic Cake Pops – Liz’s Perfect 4th of July Party Dessert
Ingredients
Method
- Preheat your oven to 350°F and line a 9-inch round cake pan with parchment paper. Whisk together flour, baking powder, and salt in a small bowl—set it aside. In another bowl, cream the softened butter and sugar together for about 2 minutes until it’s light and fluffy. This step matters because it adds air to your cake.
- Add eggs one at a time to your butter mixture, beating well after each addition. Pour in the vanilla extract and mix until everything’s combined. Alternate adding your flour mixture and milk to the wet ingredients, starting and ending with flour. Stir until you don’t see any white streaks—don’t overmix or your cake gets tough.
- Pour batter into your prepared pan and bake for 22-25 minutes until a toothpick inserted in the center comes out clean. Let the cake cool completely in the pan for about 10 minutes, then turn it out onto a wire rack. I always let mine cool completely before crumbling because warm cake falls apart in all the wrong ways.
- Once cooled, crumble your entire cake into a large mixing bowl—you want fine crumbs, almost like breadcrumbs. Beat the softened cream cheese until it’s smooth, then fold it gently into your crumbs until everything’s combined and holds together when squeezed. You’re basically making edible dough at this point, which is honestly so satisfying.
- Roll your mixture into 24 balls about the size of walnuts and place them on a parchment-lined baking sheet. Pop them in the freezer for at least 30 minutes—this is non-negotiable because cold cake pops won’t fall off your stick. While they’re freezing, insert your lollipop sticks halfway into each ball so they’re ready to dip.
- Melt your white chocolate chips with the vegetable oil in a microwave-safe bowl, heating in 30-second bursts and stirring between each one. Keep an eye on it after the second burst because white chocolate burns faster than you’d think. Once melted, let it cool for about 2 minutes so it’s warm but not scorching hot.
- Dip each cold cake pop into the melted chocolate, then immediately roll it in either red or blue sprinkles to create your patriotic pattern. Stand them upright in a foam block or small vase to set, then swap some with the other color sprinkles for that classic red, white, and blue look. They’ll firm up in about 10 minutes at room temperature.
")