
I’m gonna be honest — rice krispie treats recipe is the most forgiving dessert you’ll ever make. Seriously, if you’ve got 15 minutes and a stove, you’re basically done. The marshmallows melt into this gooey, sticky mixture that coats every crispy kernel perfectly.
My 8-year-old made these solo last week (with me hovering nearby). No baking required, no tricky techniques, just heat and mix. Save this for your next busy weeknight or that last-minute school bake sale.
This classic no bake dessert wins every single time because it’s faster than running to the bakery. Plus, you control exactly what goes inside, so these turn out way better than store-bought versions.
I personally love adding chocolate and nuts for texture, but you can keep them plain if that’s your vibe. Check out our chocolate chip cookie recipes if you want more easy dessert ideas to bookmark.
Why this rice krispie treats recipe works
Ever notice how some homemade snacks taste way better than anything from a box? That’s because you’re using fresh marshmallows and real ingredients. I made my first batch with stale marshmallows once and it was a disaster — the texture got all gritty instead of smooth.
- Quick no bake solution that takes literally 5 minutes on the stovetop
- Kid-friendly snack that even picky eaters actually ask for seconds on
- Perfect party treat recipe for school events or family gatherings
- Customizable with mix-ins so everyone gets exactly what they love
| Prep Time | Cook Time | Calories | Servings | Cuisine |
|---|---|---|---|---|
| 10 minutes | 5 minutes | 245 per serving | 12 servings | American |
Ingredients for rice krispie treats recipe
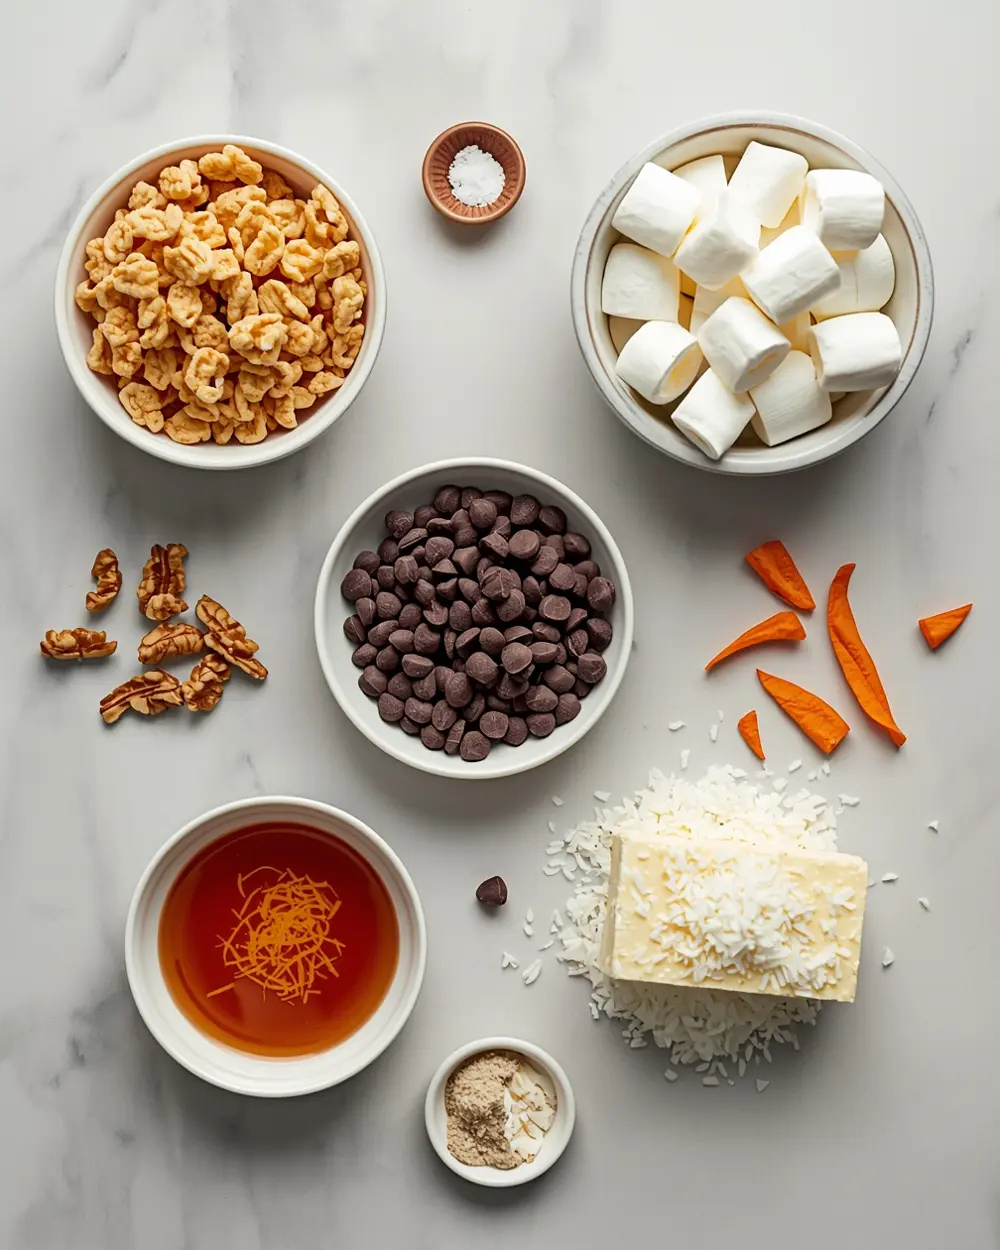
- 6 cups Rice Krispies cereal
- 4 tablespoons butter
- 1 cup marshmallows
- 1/2 cup honey
- 1 teaspoon vanilla extract
- 1/4 teaspoon salt
- 1/2 cup semi-sweet chocolate chips
- 1/4 cup chopped walnuts
- 1/4 cup shredded coconut
- 1 teaspoon orange zest
Want to swap things around? You can absolutely use brown rice cereal or even crushed graham crackers instead of half the Rice Krispies for something different. Just know that the texture changes — it won’t be quite as crispy, but it’ll still taste amazing.
Not into chocolate? Skip it completely and add an extra 1/4 cup of coconut or dried cranberries instead. Honestly, the honey and vanilla are what make this recipe shine, so don’t mess with those two. Everything else is flexible based on what you’ve got in your pantry.
Step-by-step instructions
1. Melt your butter in a large pot over medium heat — don’t let it brown or you’ll get a different flavor. Once it’s totally melted and foamy, add your marshmallows and honey. Stir constantly for about 2-3 minutes until everything combines into a smooth, sticky mixture. You’ll smell that sweet vanilla-marshmallow scent filling your kitchen, which is honestly the best part.
2. Pour in your vanilla extract and salt, then give it one more good stir. Keep the heat medium — don’t crank it to high or the marshmallows will burn on the bottom and taste bitter. Taste it real quick (careful, it’s hot!) and adjust the salt if you want.
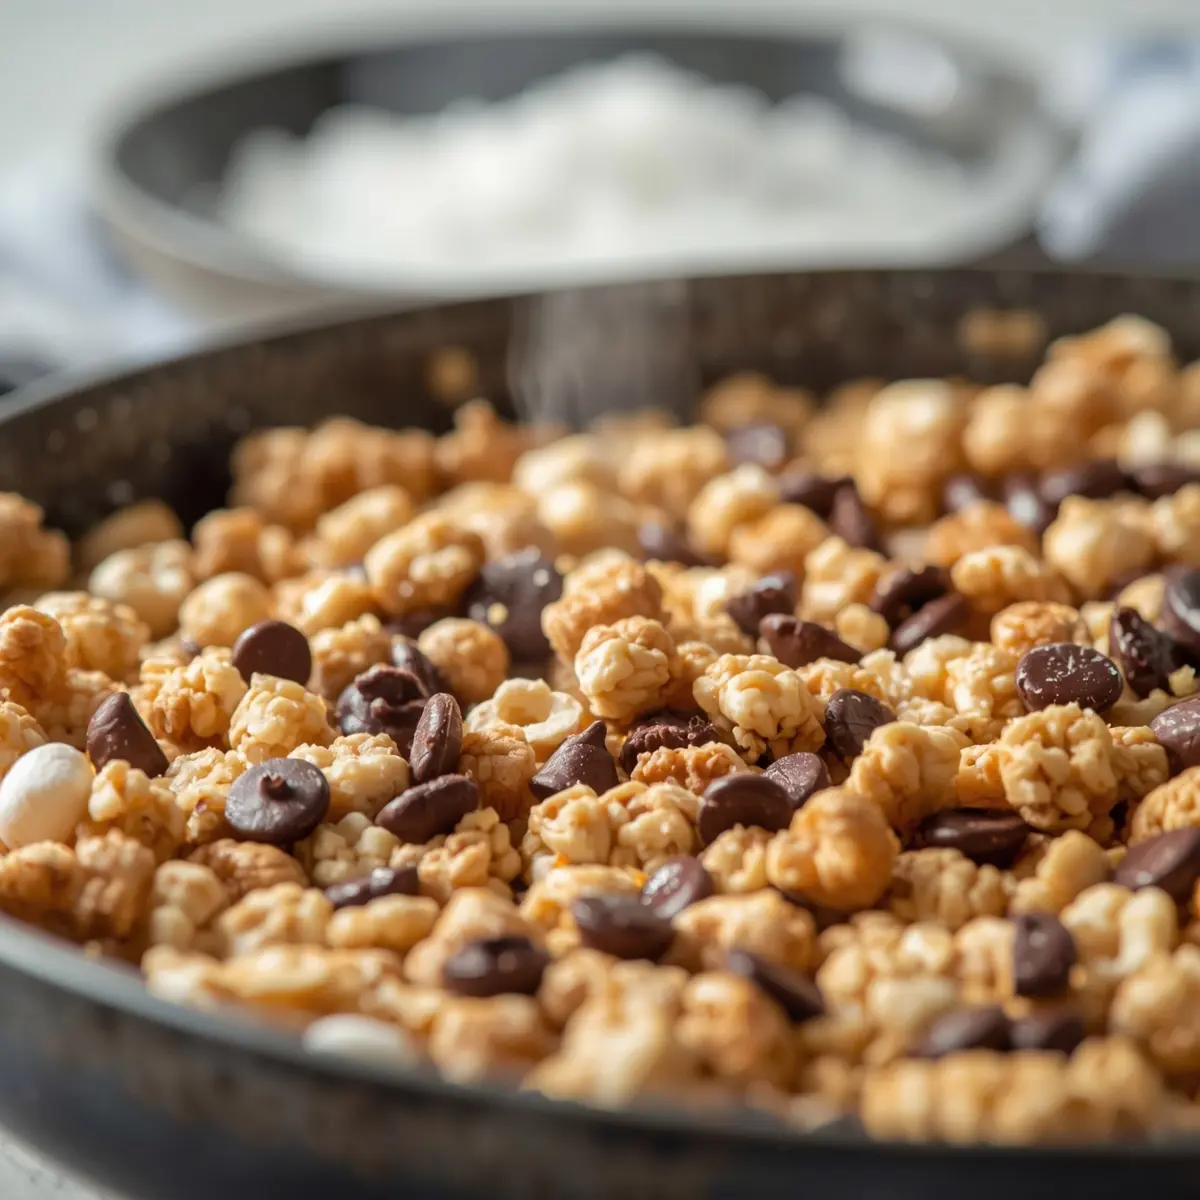
3. Turn off the heat and immediately dump in your Rice Krispies cereal. Use a rubber spatula or wooden spoon to fold everything together gently for about 1 minute. You want every kernel coated in that marshmallow mixture, but don’t overmix or you’ll crush all the crispiness out of them.
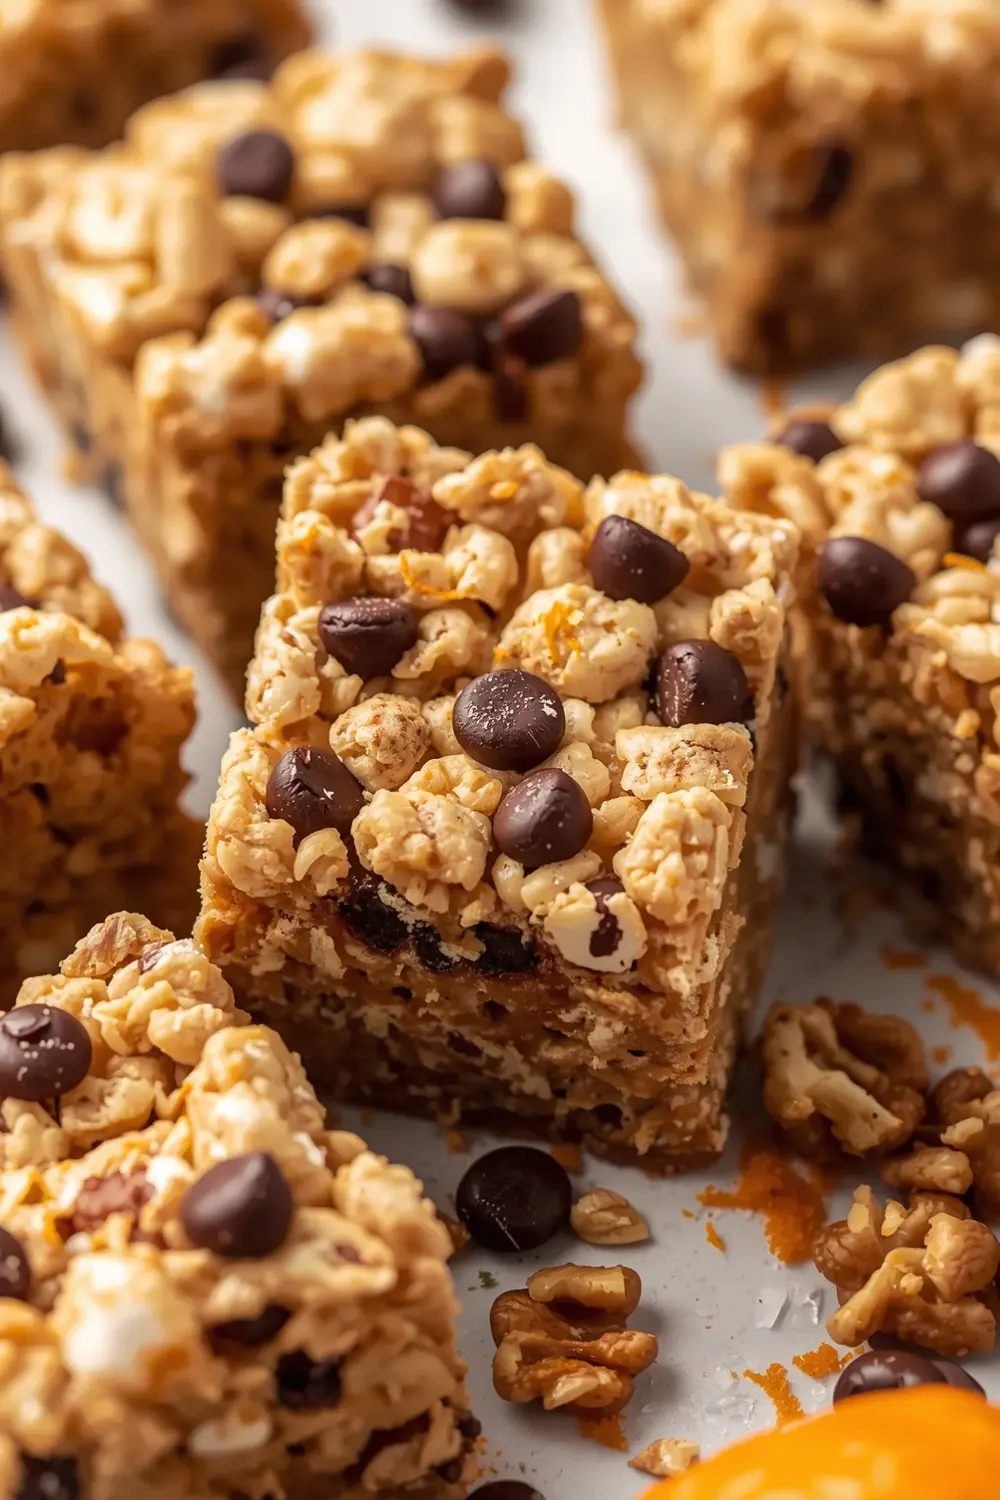
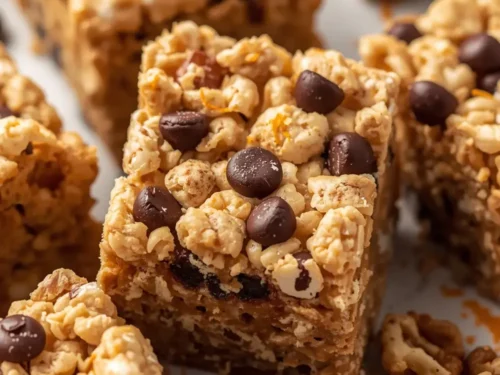
4. Fold in your chocolate chips, walnuts, coconut, and orange zest while the mixture’s still warm. The chocolate will soften a bit and coat everything beautifully — that’s exactly what you want. This is honestly where the magic happens because the flavors get all cozy together.
5. Grab a 9×9 baking pan and spray it lightly with cooking spray (trust me on this step). Pour your entire mixture into the pan immediately before it cools down and gets stiff. Use your spatula to press everything flat and even, but don’t squash it too hard or you’ll lose that crispy texture.
6. Let it cool on the counter for about 30 minutes until it’s completely set and firm. Don’t refrigerate it yet — you want the treats to firm up at room temperature first so they don’t get rubbery. Mine always sticks a little to the pan at the edges and that’s totally fine.
7. Cut into 12 equal squares using a sharp knife dipped in water between cuts. Dip your knife each time so the marshmallow doesn’t stick and tear up your treats. Store them in an airtight container, and they’ll stay fresh for up to 5 days.
Serving ideas for rice krispie treats recipe
The best part about this easy no bake dessert is how many ways you can serve it.
With vanilla ice cream
These treats are absolutely incredible when you pair them with cold vanilla ice cream on a warm day. The gooey marshmallow gets even softer and melts into the ice cream while the crispy cereal stays crunchy — it’s honestly the perfect contrast.As a lunchbox snack
Wrap individual squares in parchment paper and toss them in your kid’s backpack for school. They travel great, don’t get messy like cookies, and are way healthier than most store-bought options. Try pairing them with fresh fruit or a homemade granola bar recipe for a balanced snack.At party gatherings
Stack them on a platter with other treats and watch them disappear in minutes. The chocolate chips make them fancy-looking enough for actual company, but they taste so homemade people always ask for the recipe.Pro tips for perfect rice krispie treats recipe
Storage tips
– Keep them in an airtight container at room temperature for up to 5 days maximum – Don’t refrigerate unless your kitchen is super warm and humid – Wrap individual squares in parchment for grab-and-go convenienceMake-ahead instructions
– Prepare these the morning of your event for peak freshness and crispiness – You can make them up to 2 days ahead and store in a sealed container – Freeze them individually wrapped for up to 3 weeks if neededVariations
– Swap orange zest for lemon zest or skip citrus entirely for a classic version – Add 2 tablespoons of peanut butter to the marshmallow mixture for richness – Try crushed pretzels instead of walnuts for a salty-sweet twistTroubleshooting
– If your treats turn out too soft, you didn’t let them cool long enough before cutting – Burnt marshmallow smell means your heat was too high — next time use medium – If the cereal turns out soggy, you overworked the mixture or added ingredients while too hotFrequently asked questions
Can you freeze rice krispie treats recipe?
Absolutely — they freeze beautifully for up to 3 weeks when wrapped individually in parchment. Thaw them at room temperature for about 30 minutes before eating so the marshmallow gets back to that perfect chewy texture. Don’t thaw them in the fridge because they’ll get condensation and turn soggy, which honestly ruins the whole thing.
What’s the best substitute for marshmallows?
You can use marshmallow fluff instead, which works great and saves you from melting regular marshmallows. Use about 1 1/2 cups of fluff to replace the 1 cup of marshmallows since it’s denser. The texture comes out slightly different but still delicious and gooey.
How do you keep rice krispie treats from getting stale?
Store them in an airtight container with parchment paper between layers so they don’t stick together. Keep them at room temperature away from direct sunlight and humidity. They stay best when eaten within 3-4 days, but honestly mine never last that long.
Can you add frosting or chocolate coating to rice krispie treats?
Yes — melt chocolate chips with a little coconut oil and drizzle over the top after they cool completely. Let the chocolate set at room temperature for 20 minutes before stacking or wrapping. Some people dip the whole thing in melted chocolate, which makes them extra fancy for parties.
Final thoughts
Making rice krispie treats at home beats any store-bought version by a mile. Your kitchen will smell amazing, your family will gather around asking questions, and you’ll be done in basically no time flat.
This school snack easy enough for kids to help with, yet impressive enough for actual company. Keep this recipe bookmarked because you’ll make it way more often than you expect. For more quick dessert ideas, check out our easy brownie recipes that come together just as fast.
Trust me — once you master this no bake dessert, you’ll wonder why you ever bought the packaged version. Pin this for meal prep day and thank yourself later.
Rice Krispie Treats Gooey Crunchy and Classic
Ingredients
Method
- Melt your butter in a large pot over medium heat — don’t let it brown or you’ll get a different flavor. Once it’s totally melted and foamy, add your marshmallows and honey. Stir constantly for about 2-3 minutes until everything combines into a smooth, sticky mixture. You’ll smell that sweet vanilla-marshmallow scent filling your kitchen, which is honestly the best part.
- Pour in your vanilla extract and salt, then give it one more good stir. Keep the heat medium — don’t crank it to high or the marshmallows will burn on the bottom and taste bitter. Taste it real quick (careful, it’s hot!) and adjust the salt if you want.
- Turn off the heat and immediately dump in your Rice Krispies cereal. Use a rubber spatula or wooden spoon to fold everything together gently for about 1 minute. You want every kernel coated in that marshmallow mixture, but don’t overmix or you’ll crush all the crispiness out of them.
- Fold in your chocolate chips, walnuts, coconut, and orange zest while the mixture’s still warm. The chocolate will soften a bit and coat everything beautifully — that’s exactly what you want. This is honestly where the magic happens because the flavors get all cozy together.
- Grab a 9×9 baking pan and spray it lightly with cooking spray (trust me on this step). Pour your entire mixture into the pan immediately before it cools down and gets stiff. Use your spatula to press everything flat and even, but don’t squash it too hard or you’ll lose that crispy texture.
- Let it cool on the counter for about 30 minutes until it’s completely set and firm. Don’t refrigerate it yet — you want the treats to firm up at room temperature first so they don’t get rubbery. Mine always sticks a little to the pan at the edges and that’s totally fine.
- Cut into 12 equal squares using a sharp knife dipped in water between cuts. Dip your knife each time so the marshmallow doesn’t stick and tear up your treats. Store them in an airtight container, and they’ll stay fresh for up to 5 days.


")