Liz's Classic No-Churn Vanilla Bean Ice Cream for Summer Entertaining
vanilla bean ice cream no churn offers classic homemade ice cream simplicity through no machine required. Experience summer funtry now!
Ingredients
Method
- Pour your heavy cream into a large mixing bowl and beat it on medium-high speed until soft peaks form, about 2-3 minutes. You're looking for that cloud-like texture where the peaks gently fold over when you lift the beaters. Don't walk away—I accidentally over-whipped mine once and ended up with sweet butter instead of whipped cream (lesson learned the hard way).
- In another bowl, combine the sweetened condensed milk, scraped vanilla bean seeds, honey, and salt. Whisk until completely smooth and the vanilla bean specks are evenly distributed throughout. This is your flavor foundation, so take 30 seconds here to really mix it well.
- Gently fold the condensed milk mixture into your whipped cream using a rubber spatula. Do this slowly and carefully—you want to keep all that beautiful air in the whipped cream, so use a folding motion rather than stirring. It'll take about 10-12 folds to fully combine.
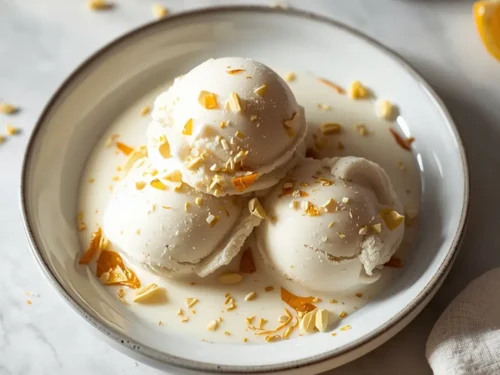
- Stir together the vanilla bean paste, whole milk, toasted coconut flakes, cardamom, lemon juice, and orange zest in a small bowl. Pour this mixture into your ice cream base and fold it in gently until the flakes and zest are evenly scattered throughout. The citrus adds brightness that balances the sweetness perfectly.
- Pour your vanilla bean ice cream no churn mixture into a 9-by-13-inch baking dish (or any freezer-safe container you have). Smooth the top with your spatula, then cover it tightly with plastic wrap or a lid to prevent ice crystals from forming. This is crucial—don't skip it.
- Pop the container into your freezer and let it sit undisturbed for at least 6 hours, though overnight is even better. You'll know it's ready when it's firm but still slightly soft enough to scoop easily. If you freeze it longer than 12 hours, let it sit on the counter for 5 minutes before scooping.
- Scoop into bowls and serve immediately, or store it in an airtight container for up to 2 weeks (though it'll probably disappear way faster than that). The longer it sits in the freezer, the harder it becomes, so pulling it out 5 minutes before serving gives you the perfect scoopable texture.